That’s what I feel like lately…like I’m constantly out in the garden. It is one of my happy places 🙂 In fact, after a long day with the kids, I like to go pull weeds or spray my homemade pesticide/insecticide, water everything, or just walk through the yard and check out how all of my “little ones” are doing. There is nothing like planting a seed and weeks later seeing it grow into a seeding and then weeks after that, harvesting your fruit and veggies that will then be brought to your table for a meal. And one of the amazing perks of spring and summer for me is constantly having a new, fresh vase of flowers on my table–fresh from our yard. I can’t take credit for that, though. The previous owners had a green thumb of their own and particularly loved flowers and decorative plants. My love is for cultivating herbs, fruits, and veggies but the existing plants that were in this yard are creating within me a love of flowers and other plants as well.
Here’s the bunch I got last week next to the one I got this week 🙂 As you can see, my irises are out in full force this week. Last week it was mostly wild flowers.


Anyway, back to edibles 🙂 I’ve been trying to take pictures of the progress of my beds but, alas, I’m not great at that. When I’m out in the garden, I want to just “be”. Today I’m going to show you the progress so far and share with you my non-toxic, homemade pesticide/insecticide recipe. I’ll also talk a little bit about companion planting, which I rely on heavily for the success of my crops and also for pest and insect control.
Here’s my largest bed weeks ago when I was still clearing and tilling the second half of it. Last year was my first spring in this house. I was only able to clear out what you see on the left side the previous summer and I did get a few things in the ground that summer (you can see my chives and, in the box, my mint–perennials that come back each year). The photo (left) is a picture from several weeks ago when I was tilling up the existing half of the bed and the photo to the right is from two weeks ago when I finally had everything tilled and ready and I was able to get my seeds and seedlings in (you can see that in that two weeks time, my chives flowered!).


My gardens are about 70% seed and 30% seedlings. But you can do it however you’d like, of course!
First let’s talk about pests.
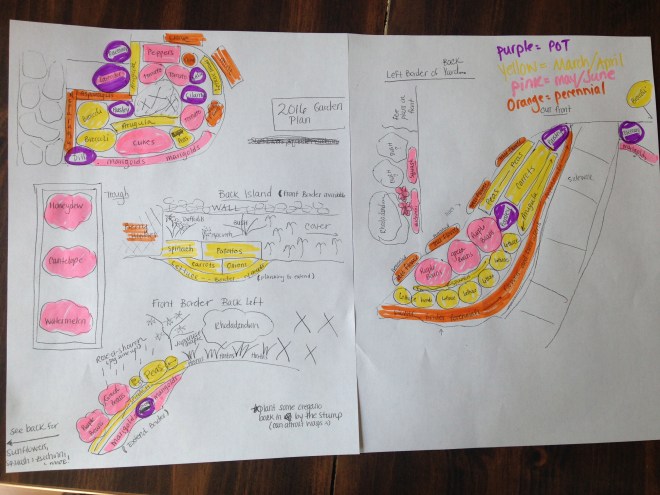
I like to border my beds with fragrant herbs and flowers to keep pests at bay. We have a problem around here with chipmunks and squirrels in particular. Deer can be an issue sometimes (which is why I’ve got my berry bushes fenced in), but the little rodents are more of a problem for me! I border with potted herbs and fragrant plants/flowers–lavender, rosemary, chives, marigolds, mint, dill, cilantro, parsley, and oregano are my choices. If you’ve got little kids, be careful with your oregano, as it can attract wasps. Wasps can be a beneficial inset in the garden but they can also be aggressive so just be careful!
Once I’ve got my first line of defense up, I cage in some of the more vulnerable plants. For us, it’s tomatoes, hands down. Last year when I caught a chipmunk red handed with a big, juicy, ripe tomato in his paws munching away, my then-three-year-old said “it must be Alvin because he is NOT a good listener.” Well…I could not agree more, sweet boy! ❤ This little guy and his friends are NOT good listeners! So I cage my tomatoes. And even that doesn’t always deter but it helps tremendously. Other plants that may need caged, depending on which pests you have, include carrots, leafy greens, melons and other fruits, and berry bushes should always get netting…otherwise, you’ll provide a nice meal for the birds but nothing for yourself!
Next I mix up my non-toxic, homemade pesticide/insecticide, which is made with 100% therapeutic grade essential oils. You all know by now there is only brand of oils I trust–contact me if you want to learn more about this! I use a blend of 6 oils: Peppermint, Lavender, Rosemary, Tea Tree, Black Pepper, and Thyme. Why these oils? I have researched each of these oils for their pesticide and insecticide abilities. I am not going to go into every single oil here and what it repels (each of them repel MANY things, which is why they’ve been chosen out of the hundreds of oils out there!). I can’t say that I would recommend this book for any of its other chapters, BUT chapter 18 in The Complete Book of Essential Oils & Aromatherapy is an outstanding reference for gardening with essential oils.
You’ll need a home sprayer…the number of gallons doesn’t really matter. If you have a smaller sprayer, just adjust the number of drops of oils that you’ll use. It isn’t an exact science and as you all know, I like to eyeball things. 😉 So, here’s now I make mine…
Add a little water to the spray jug. Add 10 drops of each essential oil (listed above). Then fill the remainder of the jug with water. It’s that easy! Shake it up and spray, spray, spray! The quality of oils you are spraying MATTERS. Do not just walk into CVS and buy oils and spray them all over your edibles. They must be pure oils or they will not be non-toxic. I cannot stress enough that if you need more education about what a “pure” oil is, please contact me. For legal reasons, I cannot include any brand names in this blog so please contact me with questions! All of these oils (if pure!) are safe to spray on your edibles so go to town! In fact, certain oils have been said to enhance the flavor of certain plants. You can read about this in the above referenced book. Many of these oils have anti-fungal properties so if you see any kind of mold starting on your plants, get out there and pray them! I saved my yellow squash last year in exactly that way! This spray is not just a pesticide, it’s an insecticide, too.
Need some information on those essential oils? Email me!

So let’s talk about insects!
My main defense against insects is truly the homemade spray. Each oil has so many properties and can repel so many different unwanted insects that it’s really the perfect combination for any fruit, veggie, and herb garden.
In addition to my homemade insecticide, I rely on the herbs and companion planting. I highly recommend you check out Rodale’s Companion Planting guide for plant pairing when it comes to insects. This book has been my “Bible” for the garden. I rely heavily on the info between the covers to plan out my entire garden each year. Especially because I’m adding new plants each year and I like to rotate my crops to help diversify the soil (another tip you can read all about in the Rodale book). This book will help you with insect control but it will also teach you where to place your plants for optimum growth. If you have a year where something just doesn’t come to fruition for no apparent reason, you’ve probably got it next to an “enemy” plant! Certain plants actually thrive next to other plants. And certain plants will repel insects on behalf of other plants. A good blanket statement to live by is that herbs will deter pesky insets and attract beneficial ones.
For instance, plant some rosemary and mint next to your broccoli and they will keep cabbage worms at bay 🙂 Also, certain spiders, birds and yellow jackets will eat cabbage worms. So you don’t want to use a store-bought spray that will just kill any and everything in sight. You do need certain insects and birds hanging around in order to have a healthy garden. I keep a bird feeder right next to the garden. And we are very bee-friendly in this house. We never squash bees–in fact, one of the reasons I border with marigolds and other deer-resistant perennials is to attract our pollinating friends to my fruits and veggies. After all…no pollination, no fruits and veggies!


I hope this post has been helpful for you. I will be back in a few more weeks with another garden post to show you how my pesticide is working and how the crops are growing! 🙂 Until then, happy gardening!
Please comment below if you have questions about anything in this post or if you’d like to share what you’re doing in your own garden! 🙂